

 10:31
10:31
 Vidi Okta Deadpool

Using Ink Drops in Your Digital Compositions
We all love Photoshop and its effects, but sometimes it’s great to get your hands dirty when creating elements for your graphics. Ink drops can add a creative and energetic element to your designs. This tutorial demonstrates techniques to creatively work ink drops into your compositions.
Final Image Preview

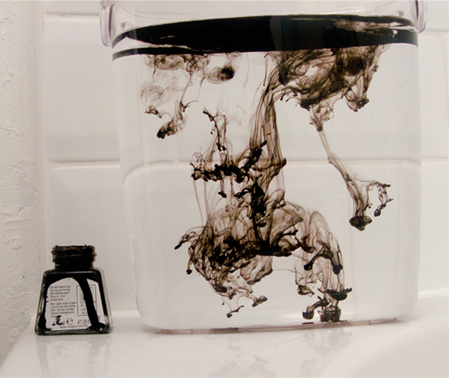
Step 1
The first and probably most fun part of this tutorial is to photograph the ink drops. Get some Indian ink and any type of clear container (I used a food container). Fill the container with water, then drop in the ink and snap away.Tips: Constantly take pictures while the ink drops, as the shapes will change considerably over time. Photograph the ink drops in front of a white background to produce clearer pictures. Experiment with dripping the ink using pipettes and any other device you can get your hands on.
If you don’t have access to ink and a camera then check out these images: 1, 2, 3, 4, and 5. Feel free to experiment with the ink drop images, but do pay attention to the usage license.
Step 2
Open a new document, set the background to black, and import the main image you want to use. I used a self portrait that I photographed myself. Cut out the image you’d like to use in your composition. After removing the background, we’ll be able to focus on integrating the ink into the design.

 Posted in: Tutorial Photoshop


0 comments:
Post a Comment